Aschenblog: Thoughts on Code and Fabrication

Arkanoid Game Levels

I loved playing Arkanoid when I was a kid. I spent hours playing the game over at my friend’s house when I was growing up on the original Nintendo Entertainment System. It was rated as one of the top games after its release in 1986.

I found a great Arkanoid background map set on NES maps by Rick Bruns (see below). Each level was perfectly aligned at 192 pixels wide by 232 pixels tall. The top, left and right edges were 8 pixels. Each brick was 16 pixels wide by 8 pixels tall. With a little math (and confirming in Photoshop), I found that the background could support exactly 11 brick tiles wide by 28 tall.

This made the map set the perfect asset for image parsing. My plan was to take the image as input and generate source code with level data as output. Finally, I used a 3D graphics library to render the levels in browser.

Image Parsing

I wanted to use the Chunky PNG and Oily PNG gems for image parsing. The former is a 100% Ruby implementation for encoding and decoding PNG images with read / write access at the pixel level. The latter gem uses native C extensions to improve encoding and decoding speed for Chunky. I used these gems on other projects with good success.
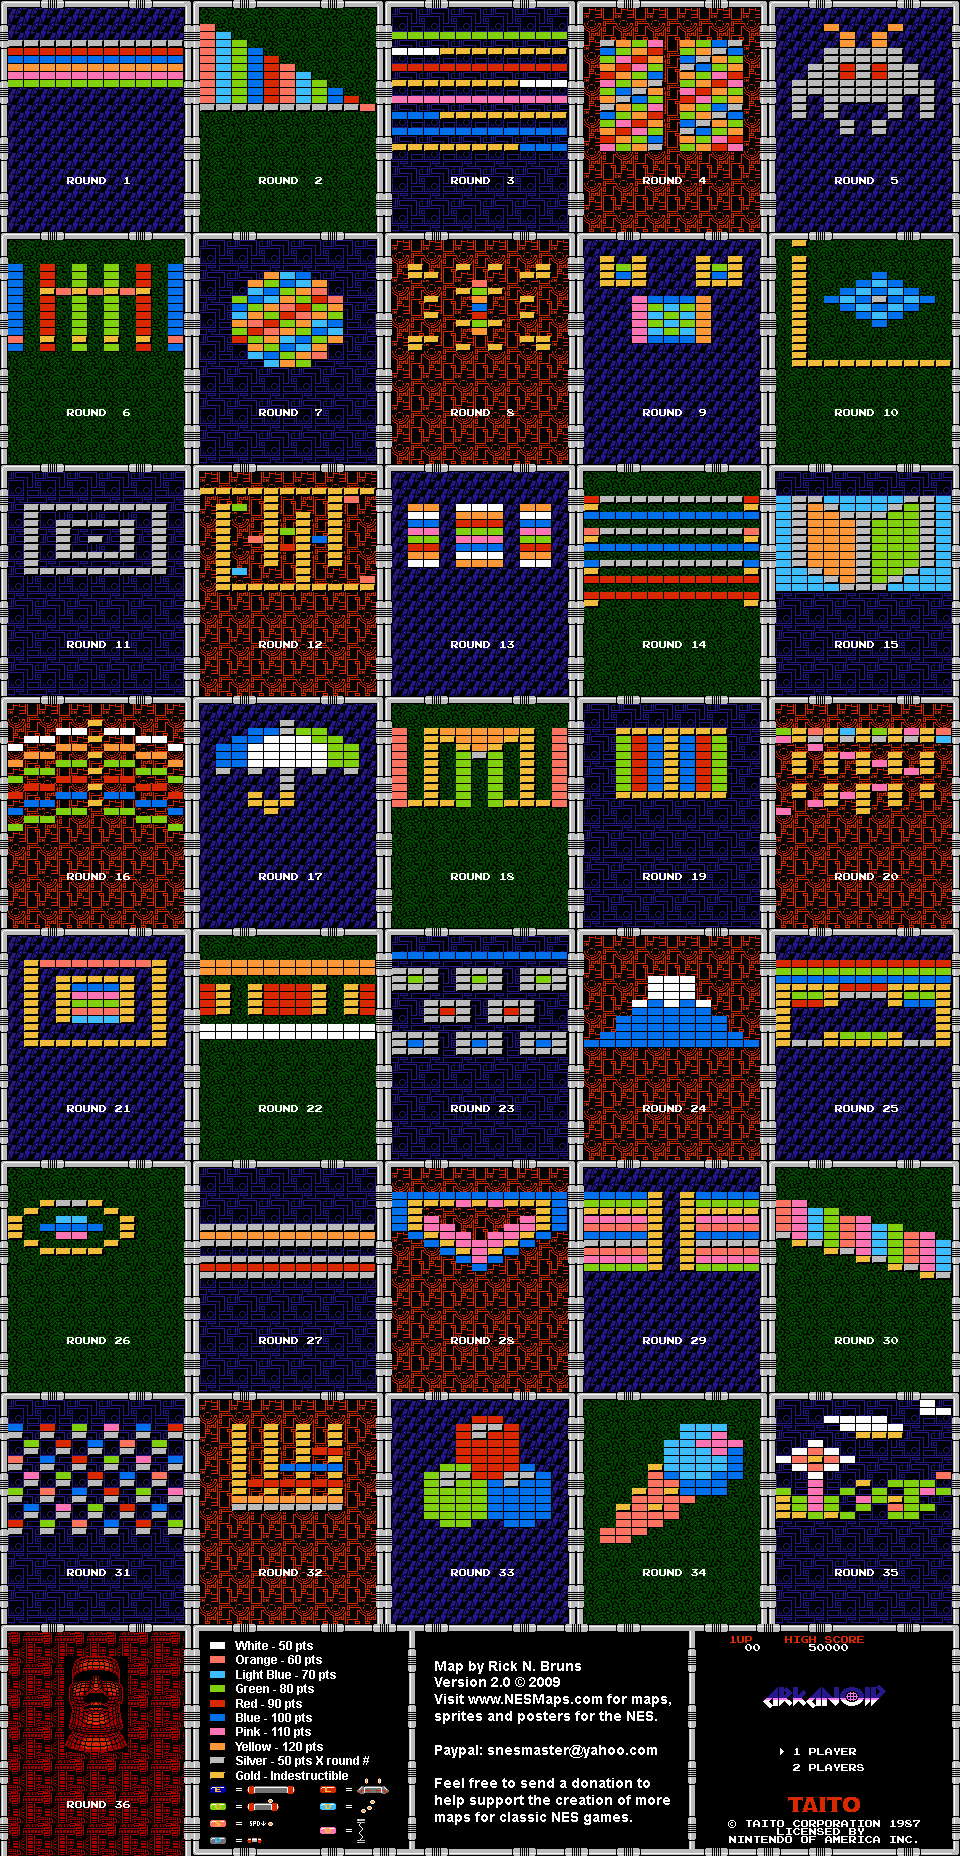
The brick colors were consistent among all of the levels. Rick created a legend with all of the colors on one page for convenience. I created a hash in Ruby to associate R, G, B values with a color index using Photoshop and my IDE:

1
2
3
4
5
6
7
8
9
10
11
12
COLOR_MAP = {
  "252,252,252" => 1, # white
  "252,116,96" => 2, # orange
  "60,188,252" => 3, # light blue
  "128,208,16" => 4, # green
  "216,40,0" => 5, # red
  "0,112,236" => 6, # blue
  "252,116,180" => 7, # pink
  "252,152,56" => 8, # yellow
  "188,188,188" => 9, # silver
  "240,188,60" => 10 # gold
}

I mentioned earlier that bricks were 16 pixels x 8 pixels, however some tiles had a drop shadow of one or two pixels. I decided to scan images for blocks of color that matched one of the keys in the hash above. I made this decision because I needed to be able to differentiate between the background (which often had long runs of pixels) and bricks.

I stored the color of the pixel in the upper left corner of a block and checked each color against this. If a sufficiently large block of color was found, I determined that it was a brick and returned nil otherwise:

1
2
3
4
5
6
7
8
9
10
11
12
13
14
15
16
17
def get_brick_color(image, x, y)
  r_initial = ChunkyPNG::Color.r(image[x, y])
  g_initial = ChunkyPNG::Color.g(image[x, y])
  b_initial = ChunkyPNG::Color.b(image[x, y])

  (0...14).each do |x_offset|
    (0...6).each do |y_offset|
      r = ChunkyPNG::Color.r(image[x + x_offset, y + y_offset])
      g = ChunkyPNG::Color.g(image[x + x_offset, y + y_offset])
      b = ChunkyPNG::Color.b(image[x + x_offset, y + y_offset])

      return nil if r != r_initial || g != g_initial || b != b_initial
    end
  end

  return r_initial, g_initial, b_initial
end

My plan was to scan the 11 tile x 28 tile grid for bricks using the get_brick_color method. Finally, I wrote a little code to generate Javascript code by printing to standard output. I decided to output two digit numbers so that the grid index colors would line up because the color indexes went up to 10.

Here is the full source for the image parsing code:

1
2
3
4
5
6
7
8
9
10
11
12
13
14
15
16
17
18
19
20
21
22
23
24
25
26
27
28
29
30
31
32
33
34
35
36
37
38
39
40
41
42
43
44
45
46
47
48
49
50
51
52
53
54
55
56
57
58
59
60
61
62
63
64
65
66
67
68
69
70
71
72
73
74
75
76
77
78
79
80
81
82
83
84
85
86
87
88
89
90
91
92
93
94
require 'oily_png'
require 'awesome_print'

COLOR_MAP = {
  "252,252,252" => 1, # white
  "252,116,96" => 2, # orange
  "60,188,252" => 3, # light blue
  "128,208,16" => 4, # green
  "216,40,0" => 5, # red
  "0,112,236" => 6, # blue
  "252,116,180" => 7, # pink
  "252,152,56" => 8, # yellow
  "188,188,188" => 9, # silver
  "240,188,60" => 10 # gold
}

# Notes:
# 8 pixel border left, top and right
# brick size: 16 wide x 8 tall (including 1 px shadow)
# Each sub image size is 192, 232
def scan_grid_location(image, sheet_grid_x, sheet_grid_y)
  startx = sheet_grid_x * 192
  starty = sheet_grid_y * 232

  array = initialize_array
  # 11 columns wide x 28 rows tall
  (0..11).each do |brick_x|
    (0..28).each do |brick_y|
      color = get_brick_color(image, startx + brick_x * 16 + 8, starty + brick_y * 8 + 8)
      next if color.nil?

      color = "#{color[0]},#{color[1]},#{color[2]}"
      color_index = COLOR_MAP[color]
      raise StandardError if color_index.nil?

      array[brick_x][brick_y] = color_index
    end
  end

  array
end

# Zero out the brick array
def initialize_array
  array = []
  11.times do
    inner_array = []
    28.times do
      inner_array.push(0)
    end
    array.push(inner_array)
  end
  array
end

# Scan to ensure block is a brick
def get_brick_color(image, x, y)
  r_initial = ChunkyPNG::Color.r(image[x, y])
  g_initial = ChunkyPNG::Color.g(image[x, y])
  b_initial = ChunkyPNG::Color.b(image[x, y])

  (0...14).each do |x_offset|
    (0...6).each do |y_offset|
      r = ChunkyPNG::Color.r(image[x + x_offset, y + y_offset])
      g = ChunkyPNG::Color.g(image[x + x_offset, y + y_offset])
      b = ChunkyPNG::Color.b(image[x + x_offset, y + y_offset])

      return nil if r != r_initial || g != g_initial || b != b_initial
    end
  end

  return r_initial, g_initial, b_initial
end

arkanoid = ChunkyPNG::Image.from_file('arkanoid.png')

# Emit javascript code
puts '['
(0..6).each do |y|
  (0..4).each do |x|
    level = scan_grid_location(arkanoid, x, y)

    puts '['
    (0...28).each do |brick_y|
      print '['
      (0...11).each do |brick_x|
        print level[brick_x][brick_y].to_s.rjust(2, '0') + ', '
      end
      puts '],'
    end
    puts '],'
  end
end
puts '];'

Here is sample output from the second map file:

1
2
3
4
5
6
7
8
9
10
11
12
13
14
15
16
17
18
19
20
21
22
23
24
25
26
27
28
29
30
[
  [00, 00, 00, 00, 00, 00, 00, 00, 00, 00, 00],
  [00, 00, 00, 00, 00, 00, 00, 00, 00, 00, 00],
  [02, 00, 00, 00, 00, 00, 00, 00, 00, 00, 00],
  [02, 03, 00, 00, 00, 00, 00, 00, 00, 00, 00],
  [02, 03, 04, 00, 00, 00, 00, 00, 00, 00, 00],
  [02, 03, 04, 06, 00, 00, 00, 00, 00, 00, 00],
  [02, 03, 04, 06, 05, 00, 00, 00, 00, 00, 00],
  [02, 03, 04, 06, 05, 02, 00, 00, 00, 00, 00],
  [02, 03, 04, 06, 05, 02, 03, 00, 00, 00, 00],
  [02, 03, 04, 06, 05, 02, 03, 04, 00, 00, 00],
  [02, 03, 04, 06, 05, 02, 03, 04, 06, 00, 00],
  [02, 03, 04, 06, 05, 02, 03, 04, 06, 05, 00],
  [09, 09, 09, 09, 09, 09, 09, 09, 09, 09, 02],
  [00, 00, 00, 00, 00, 00, 00, 00, 00, 00, 00],
  [00, 00, 00, 00, 00, 00, 00, 00, 00, 00, 00],
  [00, 00, 00, 00, 00, 00, 00, 00, 00, 00, 00],
  [00, 00, 00, 00, 00, 00, 00, 00, 00, 00, 00],
  [00, 00, 00, 00, 00, 00, 00, 00, 00, 00, 00],
  [00, 00, 00, 00, 00, 00, 00, 00, 00, 00, 00],
  [00, 00, 00, 00, 00, 00, 00, 00, 00, 00, 00],
  [00, 00, 00, 00, 00, 00, 00, 00, 00, 00, 00],
  [00, 00, 00, 00, 00, 00, 00, 00, 00, 00, 00],
  [00, 00, 00, 00, 00, 00, 00, 00, 00, 00, 00],
  [00, 00, 00, 00, 00, 00, 00, 00, 00, 00, 00],
  [00, 00, 00, 00, 00, 00, 00, 00, 00, 00, 00],
  [00, 00, 00, 00, 00, 00, 00, 00, 00, 00, 00],
  [00, 00, 00, 00, 00, 00, 00, 00, 00, 00, 00],
  [00, 00, 00, 00, 00, 00, 00, 00, 00, 00, 00],
],

Visualization

I use the Three.js Javascript library for in browser 3D graphics projects. It abstracts some of the low level details of WebGL and provides some nice primitives.

I started with some boilerplate code which I modified from Three.js:

1
2
3
4
5
6
7
8
9
10
11
12
13
14
15
16
// Define scene, camera and renderer
var scene = new THREE.Scene();
var camera = new THREE.PerspectiveCamera(75, window.innerWidth / window.innerHeight, 0.1, 1000);
camera.position.z = 30;
var renderer = new THREE.WebGLRenderer({antialias: true});

renderer.setSize(window.innerWidth, window.innerHeight);
document.body.appendChild(renderer.domElement);

// Render frames in a tight loop
var render = function() {
  requestAnimationFrame(render);
  renderer.render(scene, camera);
};

render();

I defined some of the basics: a scene, camera and a renderer. The render function creates a loop that triggers the scene to be redrawn at 60 frames per second.

I divided the drawing elements into three parts: drawing the level, drawing a wireframe box to enclose the level and lights that provide some nice effects.

Here is the source code that describes drawing the level:

1
2
3
4
5
6
7
8
9
10
11
12
13
14
15
16
17
18
19
20
21
22
23
24
25
// Draw bricks (defined in levels.js)
var draw_level = function(scene) {
  for (var i = 0; i < 28; i++) {
    for (var j = 0; j < 11; j++) {
      var color_index = level_data[level][i][j];
      if (color_index == 0) continue;

      var shininess = 10;
      if (color_index >= 9) shininess = 50; // Gold and silver

      var material = new THREE.MeshPhongMaterial({
        color: color_data[color_index],
        specular: 0x232322,
        shininess: 50
      });
      var geometry = new THREE.BoxGeometry(2, 1, 0.5);
      mesh = new THREE.Mesh(geometry, material);
      mesh.position.z = 1.5;
      mesh.position.x += j * 2.2 - 12;
      mesh.position.y += i * -1.2 + 18;
      scene.add(mesh);
      object_list.push(mesh);
    }
  }
};

I defined a level_data array (see level.js below). This code was the output from the Ruby image parser described earlier in the post. We look up the color_index based on where are are in the loop. If the index is zero, then we skip that element. Otherwise, we create a new box that is twice is wide as it is tall (proportional to the 16 pixel x 8 pixel blocks from the original image).

We assign a material using Phong shading and the color defined in a color_data array:

1
2
3
4
5
6
7
8
9
10
11
12
13
color_data = [
  0x000000,
  0xfcfcfc,
  0xfc7460,
  0x3cbcfc,
  0x80d010,
  0xd82800,
  0x0070ec,
  0xfc74b4,
  0xfc9838,
  0xbcbcbc,
  0xf0bc3c
];

The index of the array corresponds to the value in the level_data array. We use black 0x000000 as a placeholder color. Finally we define a mesh with the geometry and material variables. The brick position is defined by its (i, j) position.

Here is the demo for the code (fullscreen):

These are the relevant full source files:

  • 3d.js - Event handling and rendering code
  • levels.js - Level and color data

Comments