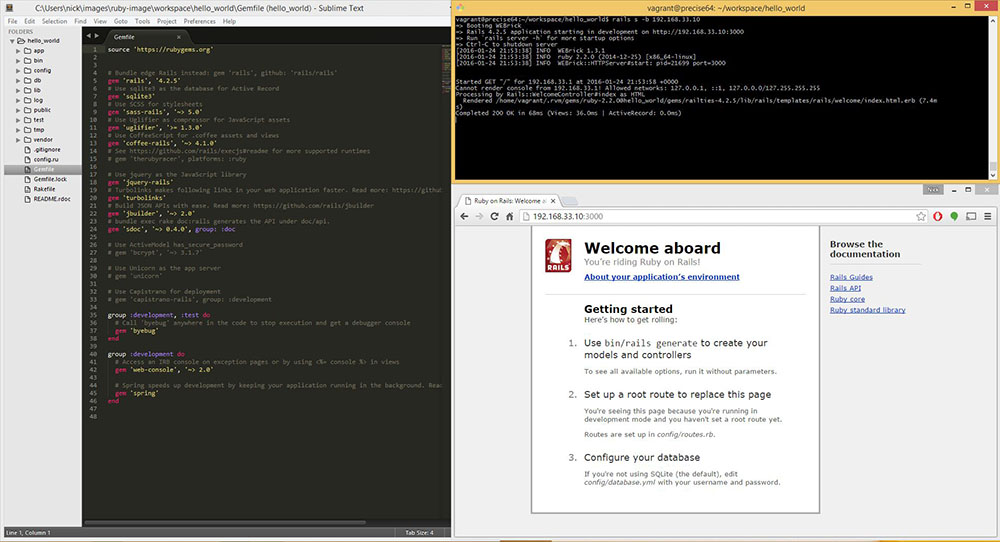
I wanted to share a workflow that I use to do Ruby development on Windows using Vagrant. I should mention that I always prefer to do Ruby development on a Mac or running Linux, but this workflow might work well for someone doing both .NET and Ruby development.
This general approach should work in most cases where the development environment does not match the deployment platform. As a first step, I suggest trying out the Ruby Installer for Windows. I’ve found that this works for small projects, but have trouble with larger projects especially with a large number of gem dependencies.
The workflow involves using your native environment to launch a virtual machine that more closely matches the one use to deploy your code in production. You get the benefits of the windowing system tools (Sublime Text, RubyMine, Notepad++, etc) with the benefits of running specs and code in an environment closer to production.
Dependencies
To get started, we are going to need to install a few tools:
I like using Git bash shell, however this is optional. I love that it is bundled with a SSH client because I find it easier to use than Putty.
We are going to create a folder for our Vagrantfile and workspace. The Vagrantfile is a description of your virtual
machine. We are going to create an Ubuntu VM, but you can choose an environment that is appropriate for you. Check out
the public catalog of boxes for a list.
Getting Started
After everything is installed, let’s open up a Git bash shell:
1 2 3 | |
We need to create a Vagrantfile in the ruby-image directory. You can create a stock one using vagrant init . or
just create a new file with the following contents:
1 2 3 4 5 6 7 8 9 10 11 12 13 14 15 16 17 18 19 20 21 22 23 24 25 26 27 28 29 30 31 32 33 34 35 36 37 38 39 40 | |
Proxy Configuration
You may notice that I commented out a number of lines related to proxy configuration. If you are behind a web proxy at work, then you may find the Vagrant proxyconf plugin useful. To install it from the command line:
1
| |
Then you can change the proxy configuration to match your network setup. You need to comment in lines 22-26 and 35. You should comment out line 33. Proxies can be frustrating and this may take a little tinkering. One of the beautiful things about Vagrant is that you can create and destroy reusable development environments really easily.
Start the VM
Let’s fire up our VM:
1
| |
The first time you run this command, it will take several minutes to download the box image. On subsequent runs, it should take much less time. The provisioning takes a few minutes for me, but your milage may vary.
You may notice that I added RVM during provisioning to help manage our ruby version and gemsets. Feel free to use rbenv or other tools as you see fit. I also installed ruby version 2.2.0, but feel free to modify this.
Now, your virtual machine should be up and running. If it is not, then read through the error messages and address the issues. Let’s SSH into the box:
1
| |
You should see the typical bash prompt. You may need to source the rvm file and install a particular Ruby version:
1
| |
Databases
I intentionally left out a database from the Vagrantfile. Choose whatever database technology works for you (or none
at all).
To install a MySQL database:
1
| |
To install a PostgreSQL:
1
| |
You may need additional dependencies. Typically you will see failures when running bundle install.
Create a Rails App
Make sure you are logged into the VM. Let’s create a new empty rails app:
1 2 3 4 5 | |
Creating the gemset should result in output like the following:
1 2 | |
The rvm 2.2.0@hello_world tells rvm to use Ruby version 2.2.0 with our newly created gemset hello_world.
Bundle install might take a while depending on your machine and network connection. At this stage, it is not uncommon to still be missing dependencies. Usually a quick google search can resolve these.
The gem documentation also takes a while to install. You can prevent this by creating a file in your home directory
called .gemrc with the following contents:
1
| |
Let’s fire up the Rails server:
1 2 | |
We are telling rails server to bind to the IP we specified in the Vagrantfile. This is so that we can connect to
the server from the Windows host.
From here it is easy to connect to the shared workspace folder in Windows and use git bash to run commands from the command line and use a browser to connect to your application:

You might consider adding some memory available to the VM. You can do this by shutting down the VM via vagrant halt
and then opening up the VirtualBox program. I usually give the VM about 50% of the host machine’s RAM.
That’s it for this week. Happy hacking!